Beauty Retouching is one of the most popular areas in which Adobe Photoshop is used widely. When we mention Retouching, people often think about fashion models and cover girls they see in magazines. Although it’s a deceptive art we love to use it. So not talking much, I am going to show you how to use Retouching abilities in Photoshop.
Beauty Retouching Process
Step 1
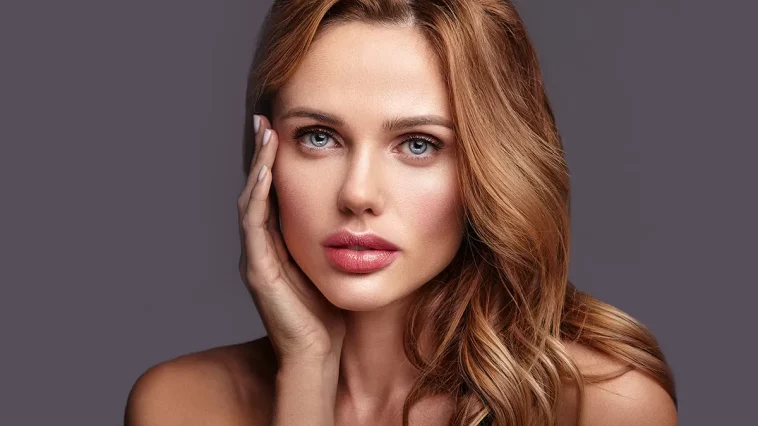
First, open the blemish girl image in Photoshop and see the blemishes of that girl carefully. The idea here is to first clean those blemishes and then smooth out the skin without making the face look like plastic. The face should not lose its originality too. Download the image from below…

Step 2
Duplicate the girl layer and name it Healed. Now on that duplicate layer, we are going to use a spot healing tool to clean those blemishes. The rule of thumb here is that the equal the brush( to the blemishes) the better the healing is done because the spot healing tool heals from the pixels around the brush. See the image…
So if blemish spots and brush size are equal then the spot healing tool gets more space for cleaner pixels.

See The Healed image…

Step 3
Now Duplicate the Healed layer and name it Skin. Go to filter>blur>surface blur and apply it using the setting below…

Apply a layer mask, fill it with black press’ D’ to return to the default fg/bg color. Now take a soft brush and start painting with white on the eyes, lips, and eyebrows to make it unaffected by the surface blur filter.

Step 4
Now For lips draw a selection on the lip part. Make a new layer fill it with red color change the blending mode to color and also change the opacity to 20%. This will change the color of the lips without affecting the shade of the underlying lip layer. See in image below…

Step 5
Now We Go to the Healed layer and apply a Levels Adjustment Layer above it. See the image below…

Step 6
Now We Apply the Hue Saturation Adjustment Layer above the healed layer. See the image below…

Now fill the Adjustment layer’s mask with black and start painting with a soft brush over the areas where we want red tint to effect. In My case, I applied it on the face and the hair. See the image below…

You can also change the color of your eye to what you like. But it all depends on you.
Good Luck And Happy Retouching…….
You can also download the PDF version
Comments